How to Crop & Re-size Photos for Your Farm Website & Emails
Last update: August 26, 2024
If you’re working with Grapevine, we’ll be the ones to crop and re-size your photos when we build your website. This guide is especially for farms who are building their own website, as well as for our farm clients who might be managing photos for ongoing email marketing and website updates.
Getting your farm photos ready for use in your website and marketing emails is easy — just follow our steps to crop, scale, and export!
(Related: Find out why you should be optimizing your farm photos!)
Free Software for Cropping & Resizing Farm Photos
BeFunky is a powerful free tool for image editing. Editing image files can be intimidating, but don’t worry. We will walk you through the process and you will feel comfortable and confident in no time! Befunky is available to use straight from your browser.
Once you’ve created an account, you’re ready to go!
Canva is also a great option if you already use it, but please note optimizing images requires Canva Pro, their paid version.
Step 1: Open Your Photo in BeFunky
Be sure that you are using the original photo. If the image was saved to the cloud from your phone or emailed from your phone, it may have been compressed and the image quality could be reduced. Transferring to your computer via USB/phone cable will help ensure that you are working with the original unmodified image.
From BeFunky, click Get Started and select Edit a Photo.
At the top of the page, select Open > From Computer, and use Finder on Mac, or Windows Explorer, to find your image file.
Click on this image for a closer look.
Use the slider at the bottom of the window to zoom your view in or out. (This only changes your view, not the actual image size.)
Click on this image for a closer look.
Step 2: Crop Your Photo (change the aspect ratio)
This is where we change the proportions of your image (aspect ratio). Aspect ratio describes the relationship between the width and height of an image.
You’ll want to use this step if:
You’re changing a rectangular image to a square, or a skinny rectangle to a wider rectangle, etc. This process will help you change proportions without your photo getting distorted.
Or, you want to keep the aspect ratio the same, but you want to zoom in a little on an area of the photo.
If you don’t need to change the proportions of your photo, you can skip this step and go straight to Step 3.
First, select the Crop tool from the left-hand menu.
Next, decide whether you want square or rectangle. We recommend square photos for farm products on website platforms like GrazeCart, Shopify, or Square. The most important thing is to make all of them the same aspect ratio for a consistent, polished look.
Click on this image for a closer look.
Choose the instruction set that fits your needs…
Crop to Square
1. From the dropdown, select Square 1x1.
2. You’ll see a highlighted square over your image. Adjust it until you have exactly the area you want highlighted.
3. To complete the crop, just click on the Apply button.
Now you’re ready to move on to Step 3!
Click on this image for a closer look.
Crop to Rectangle
The key is to know what kind of rectangle you’re aiming for, which is defined by its aspect ratio. Common aspect ratios include:
4:3 (aka 4 parts wide to 3 parts tall — the shape of most mobile phone photos)
16:9 (aka 16 parts wide to 9 parts tall — great for wide, shallow banners)
If you want a tall photo instead of a horizontal photo, you’d reverse those (e.g. 3:4).
If your banner image will have “parallax” effect, in which it glides up as the page scrolls down, give it a little extra height so that it’s got room to reveal itself.
If you’re cropping photos that will all display together side-by-side — say your online store, blog feed, or a collage in your Drip email — make a note of the aspect ratio you choose, and stick to it for all future photos to achieve a consistent grid-style look.
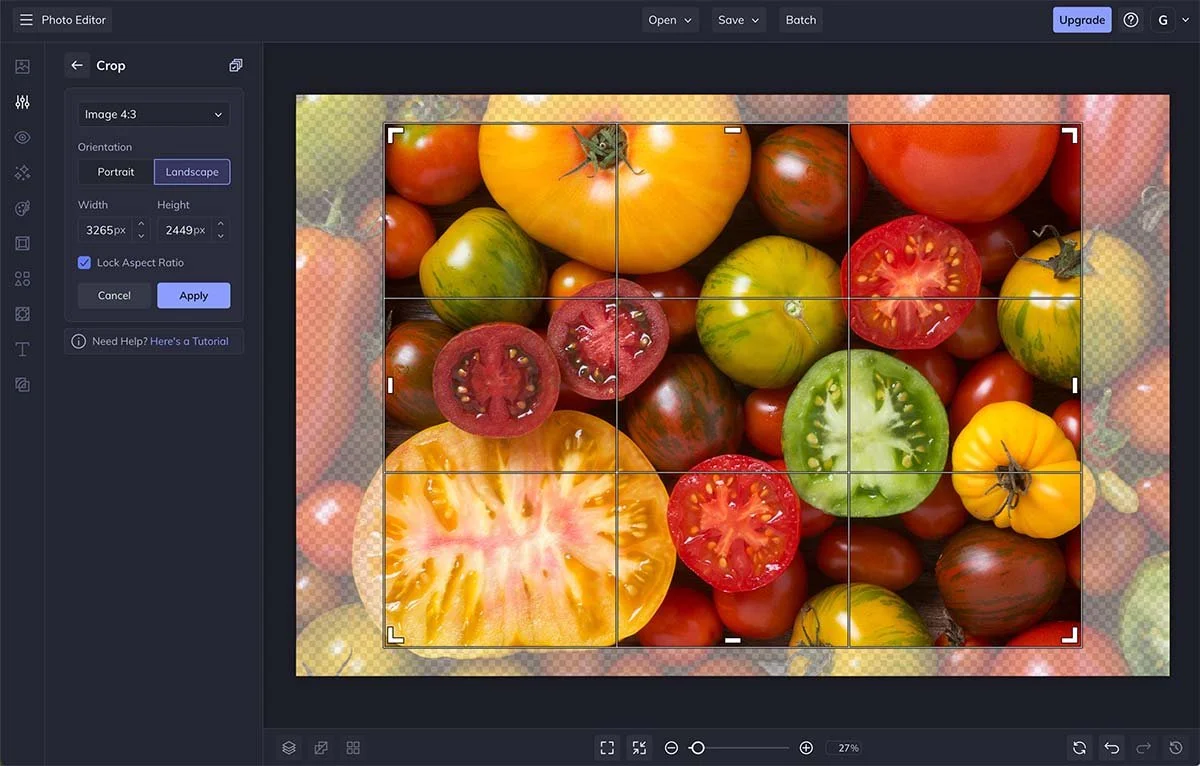
1. From the dropdown, select the aspect ratio you’d like to use, like Image 4:3 or Photo 16x9. Select if you’d like the image to be Portrait (vertical) or Landscape (horizontal).
2. You’ll see a highlighted rectangle over your image. Adjust it until you have exactly the area you want highlighted.
3. To complete the crop, just click on the Apply button.
Now you’re ready to move on to Step 3!
Click on this image for a closer look.
Step 3: Scale Your Image
Scaling is an important step that helps reduce file size, enabling web pages to load faster.
The size that you choose will vary depending on your website and what area you are adding images to. Here are some guidelines that will be appropriate in most common situations…
Square product images: 1200 pixels x 1200 pixels.
Banner images: 1800 pixels wide x any height
Banner images are those that go across the entire width of your website, edge to edge.
Other rectangular images: 1200 pixels for the largest dimension
Email images: 1000 pixels for the largest dimension
First, select the Resize tool from the left-hand menu.
Click on this image for a closer look.
1. Mark the Lock Aspect Ratio checkbox.
2. Refer to the suggested dimensions above and enter a number to modify the largest side (often the width). The second dimension will auto-calculate that number for you. (If it’s not auto-calculating the second dimension for you, the Lock Aspect Ratio checkbox must’ve been toggled off. Click to toggle it back on.)
3. Click Apply.
Click on this image for a closer look.
Note: In most cases you should be scaling down from a higher number. For example, going from 3600 pixels to 1200 pixels. If too much of the image was cropped out, or if you started with a low quality image, your starting number might be lower. Image quality will decrease in this case. A small difference between pixels probably won’t be noticed but be sure to carefully evaluate your image quality after processing if you attempted to scale up. Consider setting image quality to 100 in step 4 below, or taking a higher quality photo if that is possible.
Step 4: Export (compress & reduce file size)
The export step is where you tell the software how much to compress the file size, which together with the scaling we just did in Step 3, will produce a fast-loading, web-friendly image.
From the top of your screen, click Save, then Computer.
A new window will pop up.
Click on this image for a closer look.
1. Type in a file name.
2. In most cases, setting the quality to 40 is optimal. Leave other settings as-is. (If you started with a lower quality image, or eliminated a large amount when cropping, you may need to set this number higher in order to retain an acceptable image.)
3. Click the Save button.
Click on this image for a closer look.
Now use Mac Finder or Windows Explorer to compare your file sizes.
Optimized images are smaller and measured in KB; original images, if they are high resolution, will be measured in MB. (1MB = 1,000KB)
In this example, our new optimized photo is only 144KB, which is a 98% reduction in file size!
Click on this image for a closer look.
That’s it! Now you’re ready to upload your freshly optimized photos to your farm website or use them in your marketing emails.
Do you have any questions? Would you like a video version of this tutorial? Let us know at hello@grapevinelocal.com
Need a hand?
If you’ve got enough on your list, we’ll be happy to help — just get in touch!

More Farm Marketing Resources